Activity: Threat Modeling
This activity will help you create a digital security priorities list, as well as build buy-in with your team by making sure you are all on the same page about what digital security risks you want to protect yourselves against.
Materials:
A blank wall
Painter’s tape
Post-it notes
Pens or fine-tip markers
Step 1 (10 minutes): Prepare your workspace. Spread out the post-it notes and pens or fine-tip markers. Tape two axis onto the wall, one horizontal and one vertical. Using painter’s tape, label one axis “S” for severity, and the other one “L” for likelihood.
Virtual activity: prepare the axis on the drawing board and label one axis “likelihood” and one axis “severity”. Make sure you are familiar with creating virtual post-its (or boxes + text) on the platform you are using.
Step 2: Gather your team and start with a discussion of what a threat model is.
Step 2 is the same in person and virtually.
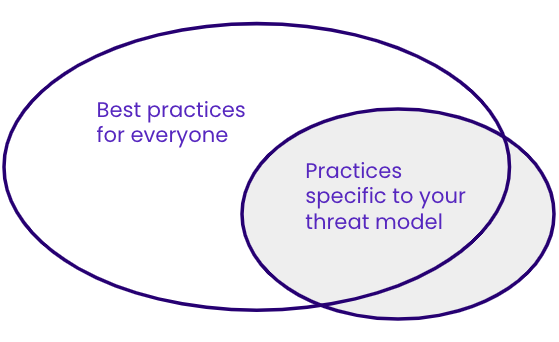
Your threat model will help you focus on just a subset of the best digital security practices.
2a (5-10 minutes): Define threat model. A threat model consists of potential attacks against you, ranked by likelihood and severity. It helps you ground your fears in reality, and helps you prioritize the digital security practices that will be most useful for you.
Threat models vary based on someone’s role...

...as well as identity.
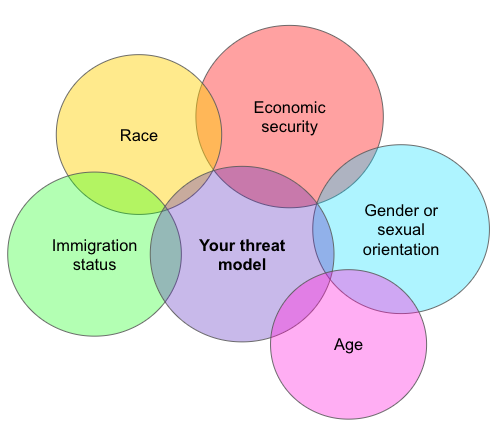
Threats will also vary based on the threat actor. You’ll want to consider a range of adversaries, from cybercriminals running general scams to ideological opponents targeting you specifically.
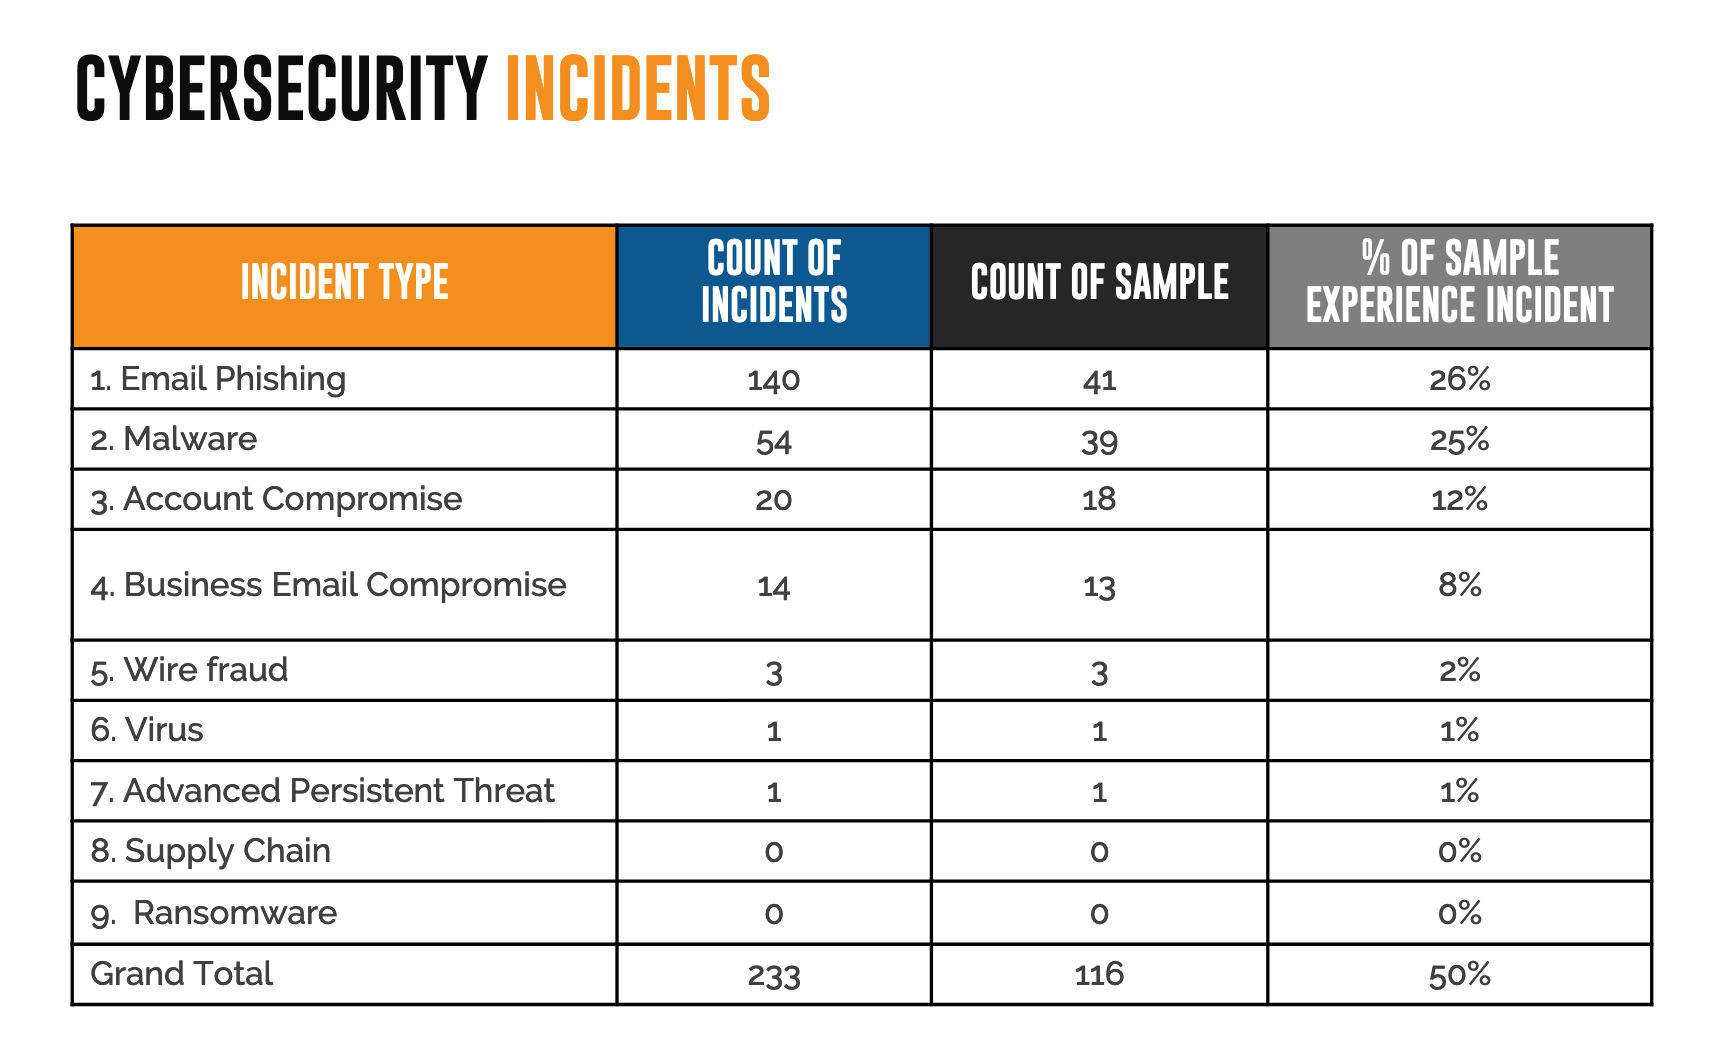
2b (5-10 minutes): Discuss past incidents or threats. The best way to predict what will happen is to look at what has already happened. You can either discuss experiences your organization has had, or pull charts from reports about your industry, like the one below.
You may also want to prepare by looking at some of our example threat modeling charts from our trainings:

Step 3 (5 minutes): Give participants time to write threats on their sticky notes.
You may want to post these questions as people write their sticky notes to help get the writing going:
What has happened to the org before? What is likely to occur?
Who are the threat actors? Fraudsters? Extremists? Governments?
Are certain members of the org more visible/public?
Are certain members of the org experiencing harassment or stalking?
Are org members or clients a part of marginalized communities?
What data do you collect?
What data do you share?
How is your data stored?
Who would be harmed by a data breach?
Virtual activity: designate a section of the virtual whiteboard where each person can work on their own post-it notes.
Step 4 (5 minutes): Ask participants to put their post-it notes on the graph, based on where they think the likelihood and severity of the threat should be. Once they’ve placed their post-it notes, ask participants to spend a minute or two looking at the post-its that other participants have placed on the graph.
Step 4 is the same virtually.
Step 5 (20 minutes +): Discussion! This part of the activity is where you’ll spend the most time. Ask different participants to volunteer to share a threat they put on the board, and why they placed it where they did. See if there are other participants who placed the same threat in a different spot - give those participants the opportunity to share why they think that same threat is more or less likely or severe. The goal here isn’t to get to a consensus (although someone deciding they want to move their post-it could happen!); rather, the goal is to understand what your team is concerned about and build buy-in for addressing the various threats you discuss.
Step 5 is the same virtually.
Step 6 (5 minutes): Document and conclude. Ask for consent to photograph or record the threat model. Once you have consent, take a photo of the threat model you’ve built, or make a written version. If taking photos, make sure you can zoom in to read each of the post-its, or take multiple photos. Store these photos in a safe place (an encrypted device or drive, or a cloud drive protected with a strong, unique password and two factor authentication). Thank everyone for their participation and note any follow-ups that you anticipate.
Virtual activity: Screenshot the virtual whiteboard once you have consent from participants.
Step 7 (on your own time): Plan follow-up. Some ideas for next steps after this activity include:
Creating a document that lays out your organization’s digital security priorities based on the discussion and threat model graph.
Organizing trainings so members of your team can learn how to protect themselves against threats that came up during the discussion.
Writing incident response plans (and potentially conducting tabletop exercises!) for the most likely or most severe threats.